You finally find the materials for that weapon mod you’ve been farming for, and then realize you have no idea which bench actually unlocks it. Every wasted raid spent hauling the wrong materials costs you time you can’t get back. We’re breaking down exactly how crafting works in ARC Raiders, what each Workshop station builds, and what to upgrade first so your next raid isn’t a guessing game.
New to the game entirely? Our beginner guide covers the basics this article builds on.
Table of Contents
- How Crafting Works in ARC Raiders
- The Workshop: Every Crafting Station and What It Costs
- Blueprints: How to Unlock Advanced Recipes
- Scrappy: Your Passive Material Source
- In-Raid Crafting: Making Gear Without Returning to Base
- What to Craft First: A Beginner’s Priority Order
- Material Farming: Where to Find What You Need
- Common Crafting Mistakes Competitive Players Make
- Key Takeaways
- FAQ
How Crafting Works in ARC Raiders
Crafting in ARC Raiders runs through the Workshop, located in Speranza. You gather materials Topside during raids, then bring them back to spend on upgrades and gear. There’s no crafting on the fly outside of a specific skill unlock, which we’ll cover further down.
Materials split into two rough categories. Basic Materials are Common rarity and cover the stuff you’ll always need: Metal Parts, Fabric, Plastic Parts, Rubber Parts, and Chemicals. Topside Materials sit at Uncommon rarity and higher, and include things like Wires, Gun Parts, Processors, and ARC components pulled from destroyed machines.
If you end up holding materials you don’t need, recycling converts them into lower-tier components. Right-click the item and select Recycle. Before you do, check the item’s recycle value against its sell value. Sometimes breaking something down nets you more value than selling it whole, sometimes it’s the opposite, so it’s worth a quick look each time rather than assuming.
The Workshop: Every Crafting Station and What It Costs
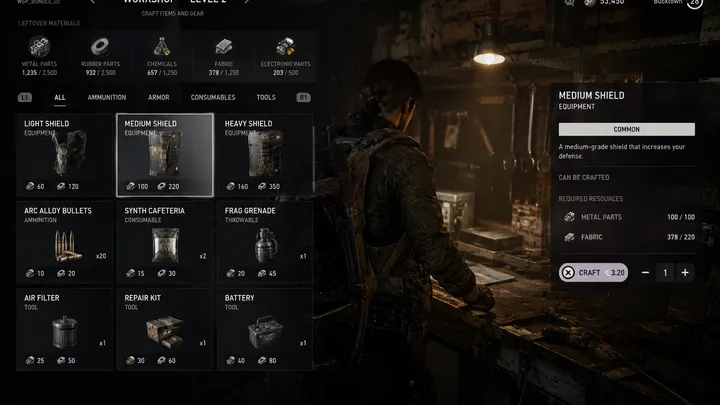
The Workshop has seven stations total: the starting Workbench plus six upgradeable benches. Each upgradeable bench caps at Level 3, and each level unlocks new recipes once you’ve got the materials.
The table below reflects the current in-game state, checked against ARC Raiders’ official patch notes through Update 1.33.0. Workshop costs do get adjusted between patches, so if something looks off after a content update, that’s why.
| Station | Level | Materials Needed | Unlocks |
|---|---|---|---|
| Workbench | 1 (max) | Free, available from the start | Ferro, Hairpin, Kettle, Stitcher, all ammo types, Shield Recharger, Bandage, Light Impact Grenade, Looting Mk. 1 |
| Gunsmith | 1 | 20 Metal Parts, 30 Rubber Parts | Rattler, weapon attachments (Angled Grip I, Compensator I, Muzzle Brake I, and others) |
| Gunsmith | 2 | 3 Rusted Tools, 5 Mechanical Components, 8 Wasp Driver | Arpeggio |
| Gunsmith | 3 | 3 Rusted Gear, 5 Advanced Mechanical Components, 4 Sentinel Firing Core | Bettina, Renegade, Hullcracker |
| Gear Bench | 1 | 25 Plastic Parts, 30 Fabric | Light Shield, Medium Shield, Combat Mk. 1, Looting Mk. 1, Tactical Mk. 1 |
| Gear Bench | 2 | 3 Power Cable, 5 Electrical Components, 5 Hornet Driver | Heavy Shield, Combat Mk. 2, Looting Mk. 2, Tactical Mk. 2 |
| Gear Bench | 3 | 3 Industrial Battery, 5 Advanced Electrical Components, 6 Bastion Cell | Combat Mk. 3, Looting Mk. 3, Tactical Mk. 3 variants |
| Medical Lab | 1 | 50 Fabric, 6 ARC Alloy | Herbal Bandage, Shield Recharger, Adrenaline Shot, Bandage |
| Medical Lab | 2 | 2 Cracked Bioscanner, 5 Durable Cloth, 8 Tick Pod | Sterilized Bandage, Surge Shield Recharger |
| Medical Lab | 3 | 3 Rusted Shut Medical Kit, 8 Antiseptic, 5 Surveyor Vault | Vita Spray, Vita Shot |
| Explosives Station | 1 | 50 Chemicals, 6 ARC Alloy | Gas Grenade, Light Impact Grenade |
| Explosives Station | 2 | 3 Synthesized Fuel, 5 Crude Explosives, 5 Pop Trigger | Blaze Grenade, Shrapnel Grenade, Snap Blast Grenade |
| Explosives Station | 3 | 3 Laboratory Reagents, 5 Explosive Compound, 3 Rocketeer Driver | Heavy Fuze Grenade, Explosive Mine, Wolfpack |
| Utility Station | 1 | 50 Plastic Parts, 6 ARC Alloy | Barricade Kit, Binoculars, Door Blocker, Smoke Grenade, and others |
| Utility Station | 2 | 2 Damaged Heat Sink, 5 Electrical Components, 6 Snitch Scanner | Lure Grenade, Raider Hatch Key, Zipline |
| Utility Station | 3 | 3 Fried Motherboard, 5 Advanced Electrical Components, 4 Leaper Pulse Unit | Photoelectric Cloak, Snap Hook, Tagging Grenade |
| Refiner | 1 | 60 Metal Parts, 5 ARC Powercell | Converts into Crude Explosives, Durable Cloth, Electrical Components, Mechanical Components |
| Refiner | 2 | 3 Toaster, 5 ARC Motion Core, 8 Fireball Burner | Converts into Advanced Electrical/Mechanical Components, Antiseptic, ARC Circuitry, Gun Parts |
| Refiner | 3 | 3 Motor, 10 ARC Circuitry, 6 Bombardier Cell | Converts into Magnetic Accelerator, Power Rod, Complex Gun Parts |
A couple of things worth flagging in this table. Several Level 2 and Level 3 recipes need a material that only drops from a specific ARC unit, like Wasp Driver from Wasp units or Sentinel Firing Core from Sentinels. You won’t find these in containers, so plan your raids around fighting the right machines, not just looting the right rooms.
These same stations also handle repairs, since most items use the same materials to fix as they do to craft. Our weapons durability guide covers repair costs in more depth.
The Refiner works differently from the others. Instead of unlocking new craftable items directly, it converts materials you already have plenty of into ones you don’t, like turning Metal Parts into Mechanical Components. Check our weapons tier list to see which Gunsmith and Refiner unlocks are actually worth chasing first.
Blueprints: How to Unlock Advanced Recipes
It’s easy to assume a blueprint is just another material, but it isn’t. A blueprint is a one-time unlock for a specific recipe. Once you learn it, that recipe is permanently available at the right station and level, no matter how many raids you run afterward.
Blueprints mostly come from loot containers during raids, with a smaller number handed out as quest or trial rewards. The catch is that you have to extract successfully while carrying the blueprint to actually learn it. Die or fail the extraction, and you lose it just like any other item, so it’s worth putting rare blueprints in your safe pocket the moment you pick one up.
If you’re coming from another extraction shooter, this trips a lot of people up. Materials are consumed every time you craft. Blueprints are spent once, and then they’re yours for good.
Scrappy: Your Passive Material Source
Scrappy is the rooster living in your Workshop, and he passively forages Basic Materials while you’re out on raids: Metal Parts, Fabric, Plastic Parts, Chemicals, Rubber Parts, and Assorted Seeds.
Scrappy has five upgrade levels, more than any combat station. Leveling him up costs items like Dog Collar, Lemon, Apricot, Olives, Prickly Pear, Mushroom, Cat Bed, and Very Comfortable Pillow, depending on the tier. His payout also scales with how long you spend in a round, with breakpoints at 1, 6, and 15 minutes, and whether you extracted. Note that he caps out after 5 rounds’ worth of uncollected materials, so don’t let his deliveries pile up too long between visits.
Scrappy is free value, but it’s slow value. Don’t let leveling him eat into materials you need for combat-relevant stations.
In-Raid Crafting: Making Gear Without Returning to Base
By default, you can only craft at the Workshop in Speranza. In-raid crafting is a separate unlock from the Survival skill tree, and it’s worth knowing it exists even if you don’t grab it right away.
The first skill, In-Round Crafting, sits in the Survival branch and adds a Craft option to your inventory (press TAB mid-raid) with nine starter recipes: Bandage, Shield Recharger, Adrenaline Shot, Light Impact Grenade, Li’l Smoke Grenade, Flame Spray, Shaker, Fruit Mix, and Agave Juice. Traveling Tinkerer sits two skills further up the same branch, gated behind a 15-point Survival threshold on the skill before it, so expect to commit a meaningful chunk of your Survival points to reach it. It adds seven more recipes: Noisemaker, Herbal Bandage, Raider Hatch Key, and four grenade traps (Blaze, Smoke, Lure, and Gas).
There’s a real limitation here: you can’t craft in bulk mid-raid, so if you need three Bandages, you’re making three separate crafts, one at a time, while exposed. That tradeoff matters more for solo players who can’t lean on a teammate to revive or patch them up mid-fight. If you’re always running with a squad, this is a lower priority than putting those skill points elsewhere. If you solo queue often, it’s worth grabbing early.
What to Craft First: A Beginner’s Priority Order
Knowing every recipe doesn’t help if you don’t know where to start. Here’s a sequence that gets you combat-ready without wasting early farming runs.
- Use the Workbench immediately. It’s free and already unlocked. Craft your own ammo and Bandages instead of buying them. Fabric is everywhere, and a single Bandage only costs 5 Fabric to craft.
- Upgrade Gunsmith to Level 1 first (20 Metal Parts, 30 Rubber Parts). It’s the cheapest upgrade that actually improves your combat performance, and it opens up early attachments.
- Upgrade Medical Lab to Level 1 next (50 Fabric, 6 ARC Alloy). Sustain keeps you alive long enough to get good at the game. Raw damage matters less if you’re dying before you can use it.
- Bring Gear Bench to Level 1 (25 Plastic Parts, 30 Fabric) once the first two are done, for access to Light and Medium Shields. This is also where you’ll start crafting Raider Augments. Our augments guide breaks down which ones are worth building toward.
- Leave the Refiner for later. It’s a genuine force-multiplier once you have surplus materials to convert, but in your first few raids you won’t have enough excess Metal Parts to make it worth the investment yet.
If you want a complete fit to run while you’re still working through these upgrades, check our budget loadout guide. Once Gunsmith and Gear Bench are a level or two further along, our best loadout guide covers what to build toward next.
Material Farming: Where to Find What You Need
Different zones tend to favor different material types, so it helps to raid with a specific upgrade in mind rather than looting at random. These are general tendencies rather than guarantees, since loot is still randomized within each zone:
- Spaceport: Electrical Components, Tech Parts, ARC Circuitry
- Dam Battlegrounds: Mechanical Components, industrial materials, Metal Parts
- Marano Park and the Blue Gate orchards: Fabric, Chemicals, and the fruit Scrappy needs (Lemons, Apricots, Olives)
A handful of materials only come from destroying specific ARC units rather than looting containers: Wasp Driver from Wasp units, Hornet Driver from Hornets, Tick Pod from Ticks, Snitch Scanner from Snitches, Sentinel Firing Core from Sentinels, Rocketeer Driver from Rocketeers, and Bombardier Cell from Bombardiers. If a recipe needs one of these, your raid plan should include hunting that machine, not just checking loot bins.
One tool worth using: select Track Resources on any recipe or upgrade you’re working toward. It highlights matching loot during your raid so you’re not relying on memory. For a full breakdown of where these zones sit on the map, see our loot map guide.
Common Crafting Mistakes Competitive Players Make
A few habits quietly slow down otherwise solid players:
- Over-investing in Scrappy too early. His output is steady but slow. Combat-relevant stations should come first.
- Ignoring the Refiner until you’re already bottlenecked. Bring it online once your main stations hit Level 2, not after you’ve already stalled out on Mechanical or Electrical Components.
- Hoarding materials instead of spending them. There’s no benefit to sitting on a full stash, and a failed extraction means losing whatever you’re carrying. Blueprints are the one thing that’s safe once learned, so spend materials with more confidence.
- Skipping the recycle value check. Sometimes an item sells for more whole, sometimes its parts are worth more broken down. It changes often enough that it’s worth checking each time.
- Not using safe pockets on rare blueprint runs. Losing a Photoelectric Cloak or Jupiter blueprint to a bad extraction is avoidable with one extra step.
Key Takeaways
- Crafting happens at the Workshop in Speranza, using materials gathered Topside during raids.
- The Workshop has seven stations: the free starting Workbench, plus six upgradeable benches that each cap at Level 3.
- Blueprints are one-time unlocks, not consumable materials. Extract successfully to learn them permanently.
- Scrappy passively gathers Basic Materials over time but shouldn’t come before combat-relevant upgrades.
- In-raid crafting requires unlocking In-Round Crafting and Traveling Tinkerer on the Survival skill tree.
- Prioritize Gunsmith, then Medical Lab, then Gear Bench for your first few raids.
- Some materials only drop from specific ARC units, so plan raids around fights, not just loot.
FAQ
How do I unlock crafting in ARC Raiders?
Crafting is available from the start through the Workbench at your Workshop in Speranza. No unlock is needed for base crafting. In-raid crafting is separate and requires the In-Round Crafting skill from the Survival tree.
What materials do I need to craft weapons?
It depends on the weapon and station. Basic weapons come from the starting Workbench, while stronger weapons require upgrading the Gunsmith bench. Common requirements include Metal Parts, Rubber Parts, Mechanical Components, and Wasp Drivers, depending on the tier.
How do I upgrade my Workshop?
Open the Workshop tab in Speranza, select the station you want to upgrade, and check the material requirements for the next level. Once you’ve gathered everything, confirm the upgrade to unlock new recipes immediately.
Can I craft during a raid?
Yes, but only after unlocking In-Round Crafting on the Survival skill tree. This adds a Craft option to your inventory with a limited set of basic recipes, expanded further by the Traveling Tinkerer skill.
What’s the difference between a blueprint and a material?
A material is consumed every time you craft something. A blueprint is a one-time unlock for a recipe. Once you successfully extract with a blueprint, the recipe becomes permanently available at the right station.
How do I recycle items?
Right-click the item in your inventory and select Recycle. This breaks it down into lower-tier materials. Check the recycle value first, since it’s sometimes more profitable to sell an item whole instead.
Which Workshop station should I upgrade first?
Gunsmith Level 1 is generally the best first upgrade, since it’s relatively cheap and directly improves combat performance. Medical Lab Level 1 is a strong second priority for sustain.
How does Scrappy work?
Scrappy passively forages Basic Materials while you’re out on raids. Leveling him up requires specific items like Dog Collars and fruit, and his output scales with both his level and how long you spend in a round.
Where do I find Wasp Drivers and other ARC-specific materials?
These drop only from destroying the matching ARC unit. Wasp Drivers come from Wasp units, Hornet Drivers from Hornets, and so on. They don’t spawn in regular loot containers.
Can I upgrade every station at once?
Technically yes, but it’s inefficient. Spreading materials across every station slows down all of your progression. Focusing on two or three stations that match your playstyle gets you meaningful upgrades faster.
Is it better to sell an item or recycle it?
It varies by item. Always compare the sell price of the whole item against the combined value of its recycled materials before deciding, since the more profitable option changes from item to item.